Turning a Shed into a Chicken Coop: The Complete 2025 Guide
Turning a shed into a chicken coop is a practical and sustainable solution for backyard poultry keepers.
It repurposes existing space, reduces construction waste, and creates a safe, climate-controlled environment for hens. Backyard chicken-keeping has surged globally due to rising food prices and interest in organic egg production. According to the United States Department of Agriculture (USDA), over 10 million American households now raise chickens.
Transforming a shed is faster, cheaper, and structurally sounder than building a new coop.
This guide explains every aspect from design, biosecurity, ventilation, and lighting to predator defense and maintenance.
1. Planning the Conversion: Structural and Spatial Assessment
1.1 Measure Shed Space and Layout
To turn a shed into a coop, start by evaluating space requirements.
Each standard laying hen needs 3–4 square feet of indoor space and 8–10 square feet of outdoor run area.
A 10×8-foot shed can comfortably house 15–20 hens, depending on the breed.
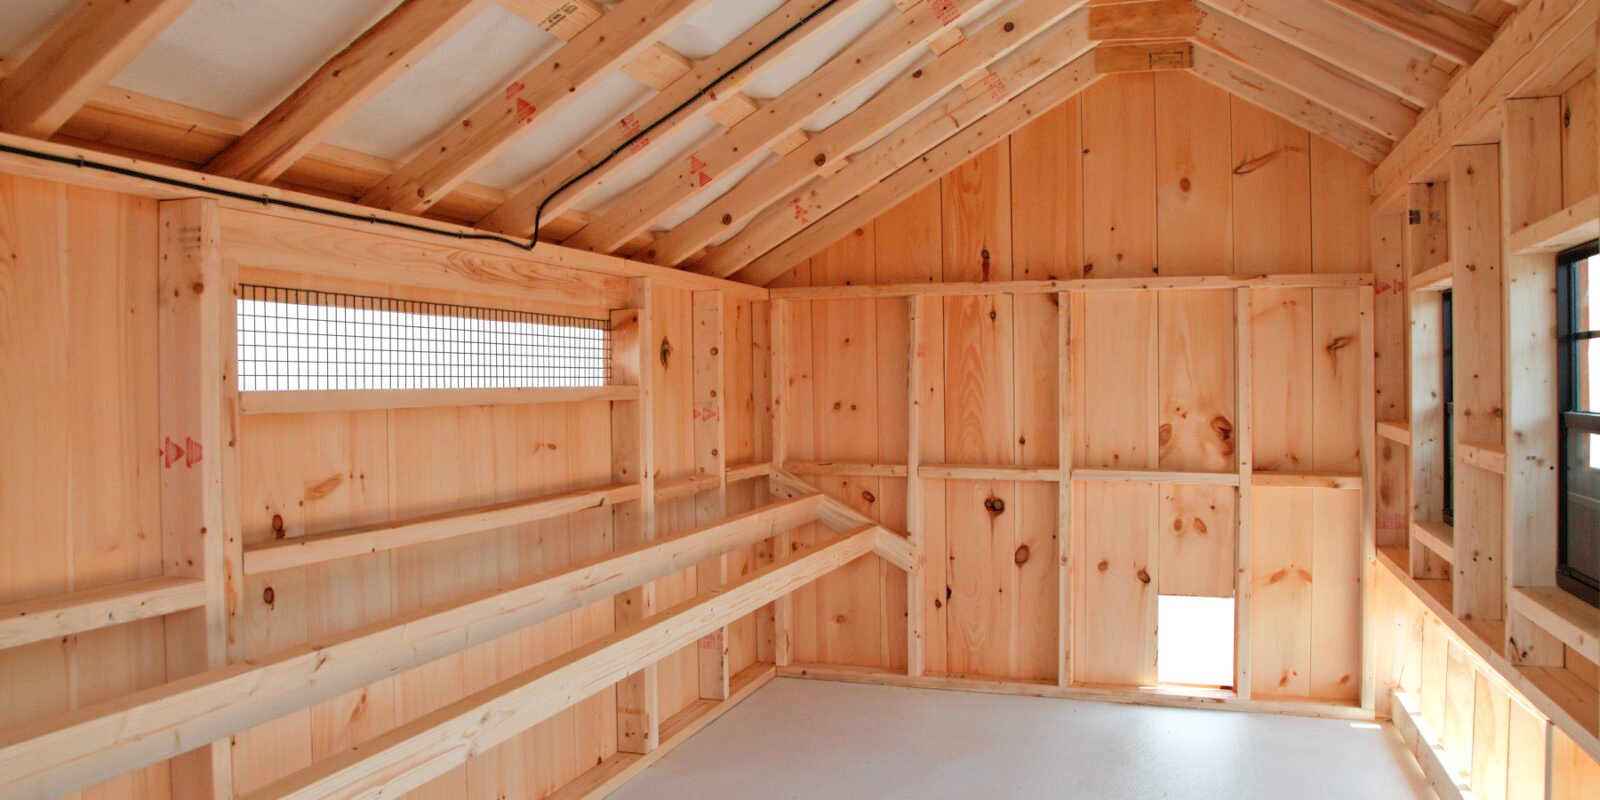
1.2 Inspect Shed Structure
Inspect the shed for foundation stability, roof integrity, and wood rot.
Ensure the shed floor is level and dry to prevent ammonia buildup.
Concrete or treated wooden floors are ideal for cleaning and pest control.
1.3 Plan Zoning Inside the Coop
Divide the shed into distinct zones:
-
Roosting area: Elevated perches where hens sleep.
-
Nesting area: Enclosed boxes for laying eggs.
-
Feeding area: Space for feeders and drinkers.
-
Ventilation area: Openings or vents for airflow.
2. Ensuring Proper Ventilation and Airflow
2.1 Importance of Fresh Air
Ventilation prevents respiratory illness and controls humidity inside the coop.
Ammonia from droppings can irritate chicken lungs and cause infections.
Install cross-ventilation windows or vents high on opposite walls to maintain clean airflow.
2.2 Ideal Vent Placement
Position vents away from roosts to avoid drafts.
Use hardware cloth instead of mesh for safety.
For cold climates, include adjustable vents that can be closed during storms or frost.
2.3 Air Quality Indicators
A coop with balanced airflow maintains a neutral odor and dry litter.
If condensation appears on windows or the air smells strong, increase ventilation immediately.
3. Flooring, Walls, and Insulation
3.1 Floor Reinforcement
Strengthen the floor with plywood sheeting over the existing base.
Apply vinyl flooring or epoxy coating for easy cleaning.
Avoid carpets or absorbent materials, as they harbor bacteria.
3.2 Wall Insulation
Insulate walls using rigid foam boards or fiberglass batts to maintain stable temperatures.
In colder zones, reflective insulation retains warmth without absorbing moisture.
3.3 Pest and Rodent Proofing
Seal every crack or gap.
Install galvanized mesh skirts around the shed base to block rodents and snakes.
Regularly inspect for signs of chewing or burrowing near the foundation.
4. Designing the Interior for Chicken Comfort
4.1 Roosting Bars
Install 2-inch round or 2×4-inch flat roosting bars.
Each hen requires 8–10 inches of perch space.
Place bars at least 2 feet above the ground and away from nesting boxes.
4.2 Nesting Boxes
Each box should measure 12x12x12 inches.
Use one nesting box per 4–5 hens.
Line boxes with straw or wood shavings for cleanliness.
Install them 18 inches above the ground, but lower than the roosts.
4.3 Lighting and Electricity
Install a low-watt LED bulb to maintain a 14–16-hour light cycle for consistent egg production.
Use solar-powered lights if off-grid.
Avoid halogen bulbs, as they overheat and increase fire risk.
5. Securing the Coop: Predator Protection
5.1 Hardware Cloth Barriers
Predators such as raccoons, foxes, and hawks target coops.
Cover all windows, vents, and openings with ½-inch galvanized hardware cloth.
Bury mesh 12 inches underground to deter diggers.
5.2 Automatic Door Systems
Install an automatic chicken door with a light sensor or timer.
This ensures hens are safely locked in at dusk and released at dawn.
5.3 Perimeter Security
Add a motion-activated light or camera system to monitor nocturnal threats.
Surround the run with electric poultry netting or chain-link fencing for additional safety.
6. Feeding, Watering, and Waste Management
6.1 Feeding Stations
Use hanging feeders to reduce waste and prevent contamination.
Ensure 3 inches of feeder space per bird.
Place feeders under cover to protect from moisture.
6.2 Watering Systems
Install gravity-fed waterers or automatic nipple drinkers to maintain hygiene.
Clean waterers weekly with vinegar to prevent algae and bacterial growth.
6.3 Waste Control
Adopt the deep litter method — layering dry bedding like pine shavings.
Microbial activity breaks down waste, producing heat during winter.
Clean the coop every 3–6 months and compost the bedding safely.
7. Lighting, Heating, and Climate Adaptation
7.1 Temperature Control
Maintain a coop temperature between 45–75°F (7–24°C).
Use insulated walls, draft guards, and deep litter to stabilize warmth.
Avoid direct heaters, as they pose fire risks.
7.2 Light Regulation
Hens lay fewer eggs in winter due to reduced daylight.
Artificial lighting keeps the laying schedule stable.
Use a timer-controlled LED bulb to simulate dawn and dusk cycles.
8. Cleaning, Maintenance, and Biosecurity
8.1 Weekly Cleaning Tasks
Remove droppings from perches and nesting boxes.
Replace damp bedding immediately.
Sanitize feeders and drinkers with a bleach-water solution (1:10 ratio).
8.2 Monthly Maintenance
Inspect for rot, leaks, or loose panels.
Lubricate hinges and tighten bolts.
Monitor for parasites using adhesive traps.
8.3 Disease Prevention
Follow biosecurity standards by USDA and DEFRA.
Avoid contact between domestic and wild birds.
Quarantine new chickens for 14 days before integration.
9. Outdoor Run and Free Range Management
9.1 Run Size and Fencing
Provide 8–10 square feet per bird for outdoor space.
Fence the area with 6-foot-tall wire mesh.
Add a net roof to deter aerial predators.
9.2 Ground Cover and Enrichment
Plant grass, clover, or alfalfa for natural foraging.
Add dust-bath boxes filled with sand and diatomaceous earth.
Rotate the run periodically to prevent soil compaction and disease buildup.
10. Shed to Coop Conversion
| Item | Average Cost (USD) | Notes |
|---|---|---|
| Hardware Cloth (50 ft roll) | $45 | Galvanized, predator-proof |
| Nesting Boxes (x5) | $60 | Plastic or wood |
| Roosting Bars | $25 | Treated lumber |
| LED Lighting | $30 | Solar or wired |
| Insulation | $70 | Foam board preferred |
| Automatic Door | $150 | Timer-based |
| Feeder & Waterer | $40 | Hanging system |
| Bedding (per month) | $15 | Pine or straw |
| Paint & Sealant | $40 | Non-toxic type |
| Miscellaneous Hardware | $25 | Screws, hinges, vents |
Total Estimated Cost: $500–$700 depending on size and material quality.
11. Step by Step Conversion Checklist
-
Inspect the shed’s structure and foundation.
-
Reinforce flooring and walls.
-
Install vents, windows, and insulation.
-
Add nesting boxes and roosting bars.
-
Secure openings with hardware cloth.
-
Setup feeders, waterers, and lights.
-
Build an outdoor run with fencing.
-
Add bedding and finalize biosecurity setup.
12. Common Mistakes to Avoid
-
Overcrowding the coop — stress lowers egg output.
-
Using untreated wood — toxins may harm birds.
-
Skipping predator-proofing — losses can occur overnight.
-
Poor ventilation — ammonia buildup causes illness.
-
Ignoring rodent control — contamination risks increase.
13. Long Term Benefits of a Converted Coop
A shed-turned-coop ensures better durability than prefabricated models.
It allows customization, easier sanitation, and greater space for feeders and nesting zones.
Chickens experience lower stress, improved health, and more consistent laying cycles.
Reusing a shed reduces environmental impact and costs, supporting sustainable agriculture practices.
It also improves property value and self-sufficiency for homeowners.
14. Sustainable Upgrades and Innovations
Install rainwater collection systems connected to waterers.
Use solar panels to power lighting or automatic doors.
Incorporate smart coop sensors that monitor temperature and humidity.
Integrate a composting unit for waste recycling and fertilizer generation.
15. Conclusion
Turning a shed into a chicken coop maximizes utility, reduces waste, and enhances animal welfare.
With precise planning, strong ventilation, and secure design, a simple shed can become a high performance poultry habitat.
FAQs: Turning a Shed into a Chicken Coop
Q1. Can any shed be converted into a chicken coop?
Yes. Most wooden or metal sheds can be adapted. Ensure structural integrity, dry flooring, and predator-proofing before adding birds.
Q2. How many chickens can fit in a 10×10 shed?
A 10×10 shed supports 20–25 hens if properly ventilated and equipped with nesting boxes and perches.
Q3. What flooring is best for chicken coops?
Vinyl-covered plywood or concrete floors are easiest to clean and most resistant to moisture and bacteria.
Q4. How do I keep predators away from my coop?
Use hardware cloth barriers, automatic doors, motion lights, and underground mesh to block digging animals.
Q5. How much does it cost to turn a shed into a coop?
On average, between $500–$700 depending on materials and features like lighting or automation.
Q6. Should I insulate the shed-turned-coop?
Yes. Insulation stabilizes temperature, prevents frostbite, and reduces humidity in colder regions.
Q7. Do I need a permit to convert a shed?
Some municipalities require permits for livestock structures. Check local zoning and animal ordinances before conversion.
Q8. How often should I clean the chicken coop?
Spot-clean weekly, refresh bedding monthly, and perform a deep clean every 3–6 months.
Q9. Can I use solar power for the coop?
Yes. Solar-powered lights and automatic doors are eco-friendly and reduce long-term energy costs.
Q10. What breeds thrive in converted sheds?
Breeds like Rhode Island Red, Plymouth Rock, and Orpington adapt well due to calm temperaments and resilience.
Learn More: Store SWGOH: The Definitive Guide for Players
Jimmy Butler Net Worth (2025): Salary, Endorsements, Assets & Lifestyle